If a source or a destination server is protected by a firewall, configure the firewall to allow data exchange between servers; to do so, allow TCP connections to the port 22 (SSH). Enabled by default.
Log in to Parallels Plesk Panel on the destination server.
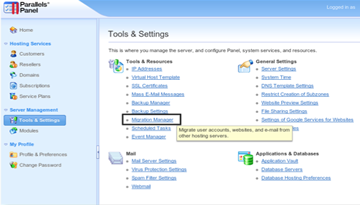
Go to Tools & Settings > Migration & Transfer Manager located in the Tools & Resources group.
Click on Synchronize to check if there are any updates for Migration & Transfer Manager components.
Click on Start New Migration.
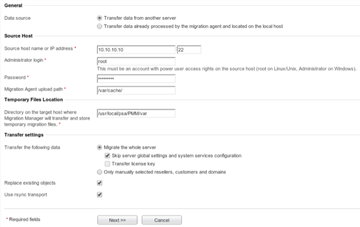
Leave the Transfer data from another server option selected, then specify the following:
Source server address and port number; specify either the IP address or the host name of the server from which you want to transfer data.
The username and password of source server administrator.
Specify whether you want to transfer all data related to user accounts, domains, and services configuration from the source server, or only specific items.
If any Panel objects from the source server (such as user accounts, domains, and so on) are already on the destination server, you can replace them by checking the Replace existing objects checkbox.
Check the Use rsync transport checkbox to reduce the amount of disk space, bandwidth, and time required for data transfer.
Click Next. The Migration & Transfer Manager will connect to the server you specified and will gather information about the business objects of the source hosting platform.
If you have chosen to transfer only specific items, now you will need to select the checkboxes corresponding to user accounts and domains you want to transfer. You will also need to specify what types of data should be transferred:
- all settings and content;
- all settings and content except mail;
- only mail accounts with email messages.
Click Next.
Once the data are retrieved from the source server, specify the new IP addresses that should be used.
Click Next to start immediately the data transfer.
If a source or a destination server is protected by a firewall, configure the firewall to allow data exchange between servers; when migrating from Windows platforms, allow TCP connections to ports 6489.
Install Migration & Transfer Agent
Log in to the Server Administration Panel of the destination server.
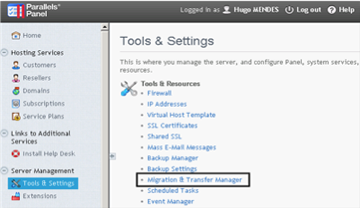
Go to Tools & Settings > Migration & Transfer Manager (located in the Tools & Resources group).
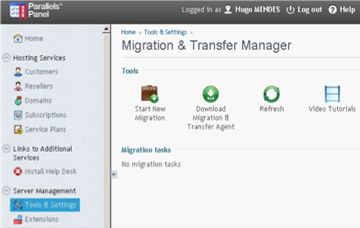
Click on Download Migration & Transfer Agent to download the latest version of the Agent.
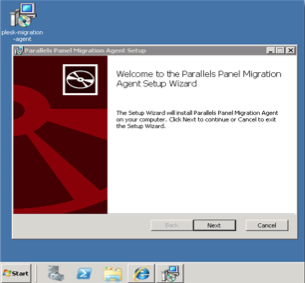
Log in to the source server over Remote Desktop, and run the installation file.
Click on Next until installation is complete.
Once the Migration & Transfer Agent is installed, it starts automatically with the default settings. Now you can proceed to transferring data.
Perform data transfer
To transfer accounts and websites with applications from other hosting servers:
Log in to Parallels Plesk Panel on the destination server.
Go to Tools & Settings > Migration & Transfer Manager (located in the Tools & Resources group).
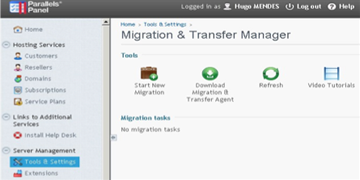
Click Synchronize to check if there are updates for the Migration & Transfer Manager components.
Click Start New Migration.
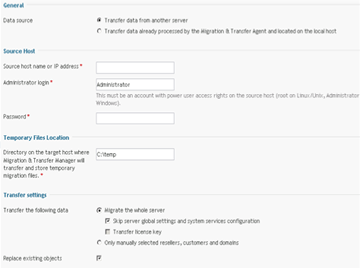
Leave the Transfer data from another server option selected, and specify the following:
- source server's address: specify either the IP address or the host name of the server from which you want to transfer data;
- username and password of the administrator of the source server.
If some of the Panel objects from the source server (such as user accounts, domains, and so on) are already present on the destination server, you can replace them by choosing the Replace existing objects checkbox.
Click Next; the Migration & Transfer Manager will connect to the specified server and gather information about the business objects of the source hosting platform.
If you have chosen to transfer only specific items, at this step, select the checkboxes corresponding to the user accounts and domains that you want to transfer. Also, specify what types of data should be transferred:
- all settings and content;
- all settings and content except mail;
- only mail accounts with e-mail messages.
Click Next.
Once the data are retrieved from the source server, specify the new IP addresses that should be used. If you have a great number of IP addresses, now you can download the current IP mapping file, edit it in a text editor or by running a custom find-and-replace script, and then upload it back to the server.
The syntax of the IP mapping file is shown in the following example:
10.10.10.10 192.168.1.2
Where 10.10.10.10 is an IP address used on the source server and 192.168.1.2 is a new IP address that should be used on the destination server.
There is a white space between the two IP addresses. When compiling the list of addresses, place each mapping entry on a separate line.
Click Next. The data transfer process will start immediately.